Downloads
Depending on the model, firmware can be updated in a variety of ways. Please read the instructions carefully to update your lens.
This software update is only necessary for Sony E-mount lenses (no update is needed for lenses other than for Sony E-mount).
This software is a program for the Tokina brand products owned by the customer (hereinafter referred to as "target products").
This software will be provided upon customer's acceptance of the following agreement.
Upon checking "I Agree" and selecting "Download", you agree to comply to this agreement.
Please read the contents of this agreement carefully before starting the download of this software.
This service provides software for updating the firmware of Tokina atx-m 11-18mm F2.8 E to Ver.03. If you already have the latest version, you do not need to update.
Please check the following before updating the firmware.
-
The purpose of new firmware updating. This new firmware is designed to improve operational stability.
-
How to check firmware version. Check with your camera whether the update is required.
Items to prepare:
- Lens to be updated.
- Camera body.
Instructions:
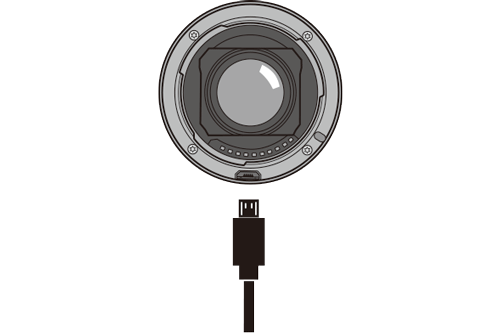
- Remove the rear cap on the lens unit and match the mount index on the lens unit with the mount index on the camera body in order to attach the lens.
- Turn ON the camera, and check the version from [MENU] → [Setup] (Fig. 1) [Version display] (Fig. 2).

- Turn OFF the camera.
- If the lens version is Ver.01 or Ver.02, an update is required.
- To update, check AGREE box for the Program License Agreement and download the firmware of the corresponding lens to your desktop or any folder on your computer.
- Refer to the "Guide for firmware update" below to update the lens with the downloaded file.
Firmware specifications
| Name | Tokina atx-m 11-18mm F2.8 E Firmware Ver.03 |
| Target model | Tokina atx-m 11–18mm F2.8 E |
| Version | Firmware Ver. 03 |
| Registered name | atx1118f28E03.DAT |
| Supported OS |
For Windows: For Mac OS: |
| File type |
ZIP file |
Guide for firmware update
Items to be prepared:
 |
 |
 |
|
Update requiring lens unit |
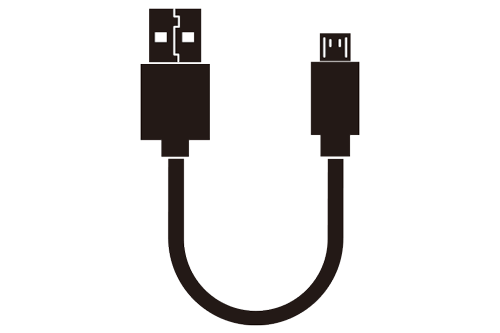
USB cable (Type-A to micro-USB) |
Update file (.DAT) |
Procedure:
STEP 1: Connect the micro-USB plug of the USB cable to the micro-USB port of the lens unit.

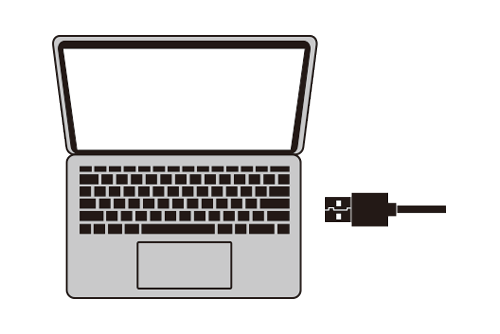
STEP 2: Connect the other end of the USB cable to the USB port of your computer.

STEPS 3-7 for Windows
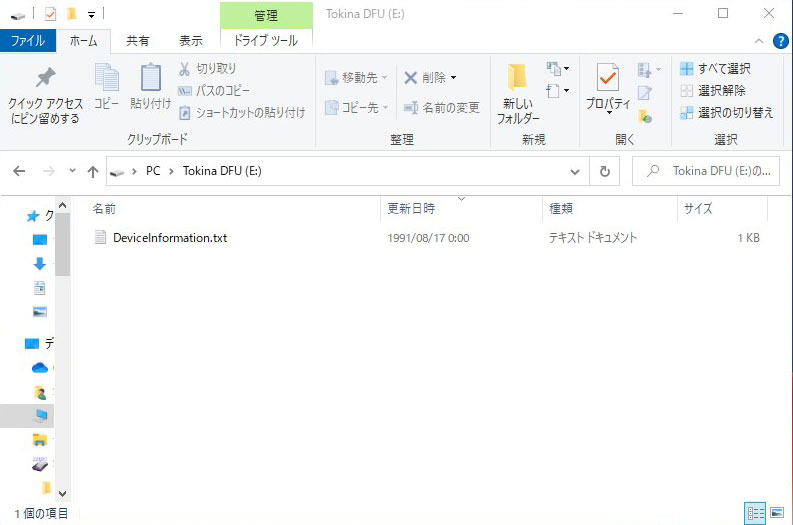
STEP 3: The folder will open automatically when the connection between the lens and the computer is completed.
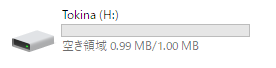
In case it does not open automatically, select [Tokina (H:)] from your PC drive to open it. H: is the drive letter. The drive letter varies depending on the PC.
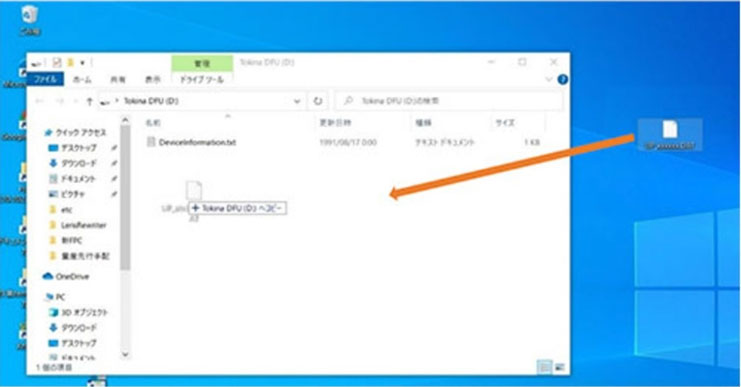
STEP 4: Unzip the downloaded file new firmware update file (.DAT) with the ZIP file software.
STEP 5: Copy (drag and drop) the downloaded new firmware update file (.DAT) to the opened USB folder of the lens and the firmware update starts to execute automatically.

STEP 6: Once the writing is completed, the USB folder closes, and after a while it opens automatically. With this the firmware update procedure is complete.
STEP 7: Close the folder and safely remove the hardware, then disconnect the USB cable.
STEPS 3-8 for Mac OS
STEP 3: When the connection between the camera lens and the computer is completed, the "NO NAME" device will be displayed on the desktop.

You can confirm whether "NO NAME" is the Tokina lens folder by checking in Disk Utility.

STEP 4: Open the Tokina "NO NAME" folder.

STEP 5: Unzip the downloaded file new firmware update file (.DAT) with the ZIP file software.
STEP 6: Copy (drag and drop) the update file (.DAT) to the opened USB folder of the lens and the update starts to execute automatically.

STEP 7: Once the writing is completed, the USB folder closes, and after a while it opens automatically. With this the firmware update procedure is complete.
STEP 8: "Eject", then disconnect the USB cable.
* After ejecting, the USB folder will be displayed with some delay, but there is no problem with disconnecting the USB cable. A warning window pop-up may also appear after that, but the hardware has been safely removed.
This software is a program for the Tokina brand products owned by the customer (hereinafter referred to as "target products").
This software will be provided upon customer's acceptance of the following agreement.
Upon checking "I Agree" and selecting "Download", you agree to comply to this agreement.
Please read the contents of this agreement carefully before starting the download of this software.
- This service provides software for updating the firmware of Tokina atx-m 11-18mm F2.8 X to Ver.1.02. If you already have the latest version, you do not need to update.
- Please check the following before updating the firmware.
The purpose of new firmware updating
- Added support for point image restoration function.
- Fixed an issue in MF mode where, under certain exposure conditions, repeatedly performing half-press shutter operations would cause only the distance scale to shift.
How to check firmware version
For most camera bodies except certain older models, checking the lens firmware version requires using the FUJIFILM XApp smartphone application.
After mounting the lens on the camera and turning on the power, open the FUJIFILM XApp and establish a communication connection with the camera.
Under "Equipment", "Lens", the connected lens will be listed. Select the lens corresponding to the displayed serial number to confirm the firmware version.
For more details on FUJIFILM XApp, please refer to the following URL: https://www.fujifilm-x.com/en-us/products/software/xapp/
For the Tokina atx-m 11–18mm F2.8 X USB update, if you attempt to update using the same version of the firmware, the update will not be executed. Instead, the firmware file will simply be copied. However, once the USB connection is disconnected, the copied firmware is automatically deleted. Therefore, regardless of the lens’s current firmware version, you can safely use the latest update firmware.
Firmware specifications
| Name | Tokina atx-m 11–18mm F2.8 Firmware Ver.1.02 |
| Target model | Tokina atx-m 11–18mm F2.8 |
| Version | Firmware Ver.1.01 |
| Registered name | atx1118f28X01.DAT |
| Supported OS |
For Windows: For Mac OS: |
| File type |
ZIP file |
Guide for firmware update
Items to be prepared:
 |
 |
 |
|
Update requiring lens unit |
USB cable (Type-A to micro-USB) |
Update file (.DAT) |
Procedure:
STEP 1: Connect the micro-USB plug of the USB cable to the micro-USB port of the lens unit.

STEP 2: Connect the other end of the USB cable to the USB port of your computer.

STEPS 3-7 for Windows
STEP 3: The folder will open automatically when the connection between the lens and the computer is completed.
In case it does not open automatically, select [Tokina (H:)] from your PC drive to open it. H: is the drive letter. The drive letter varies depending on the PC.

STEP 4: Unzip the downloaded file new firmware update file (.DAT) with the ZIP file software.
STEP 5: Copy (drag and drop) the downloaded new firmware update file (.DAT) to the opened USB folder of the lens and the firmware update starts to execute automatically.

STEP 6: Once the writing is completed, the USB folder closes, and after a while it opens automatically. With this the firmware update procedure is complete.
STEP 7: Close the folder and safely remove the hardware, then disconnect the USB cable.
STEPS 3-8 for Mac OS
STEP 3: When the connection between the camera lens and the computer is completed, the "NO NAME" device will be displayed on the desktop.

You can confirm whether "NO NAME" is the Tokina lens folder by checking in Disk Utility.

STEP 4: Open the Tokina "NO NAME" folder.

STEP 5: Unzip the downloaded file new firmware update file (.DAT) with the ZIP file software.
STEP 6: Copy (drag and drop) the update file (.DAT) to the opened USB folder of the lens and the update starts to execute automatically.

STEP 7: Once the writing is completed, the USB folder closes, and after a while it opens automatically. With this the firmware update procedure is complete.
STEP 8: "Eject", then disconnect the USB cable.
* After ejecting, the USB folder will be displayed with some delay, but there is no problem with disconnecting the USB cable. A warning window pop-up may also appear after that, but the hardware has been safely removed.
This software update is only necessary for Sony E-mount lenses (no update is needed for lenses other than for Sony E-mount).
This software is a program for the Tokina brand products owned by the customer (hereinafter referred to as "target products").
This software will be provided upon customer's acceptance of the following agreement.
Upon checking "I Agree" and selecting "Download", you agree to comply to this agreement.
Please read the contents of this agreement carefully before starting the download of this software.
- This service provides software for updating the firmware of Tokina atx-m 23mm F1.4 E to Ver.03. If you already have the latest version, you do not need to update.
- Please check the following before updating the firmware.
The purpose of new firmware updating
We have found that this lens may be subject to possible compatibility difficulties with upcoming camera firmware updates, or certain camera models to be released in the future.
How to check firmware version
Check with your camera whether the update is required.
Items to prepare:
- Lens to be updated
- Camera body
Instructions:
- Remove the rear cap on the lens unit and match the mount index on the lens unit with the mount index on the camera body in order to attach the lens.
- Turn ON the camera, and check the version from [MENU] →[Setup] (Fig. 1) [Version display] (Fig. 2).
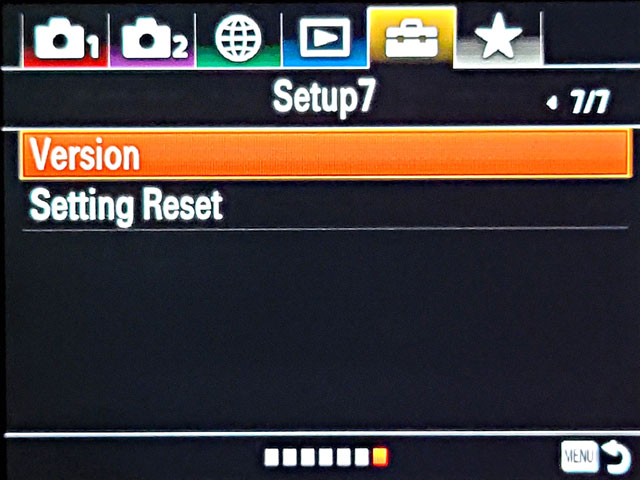
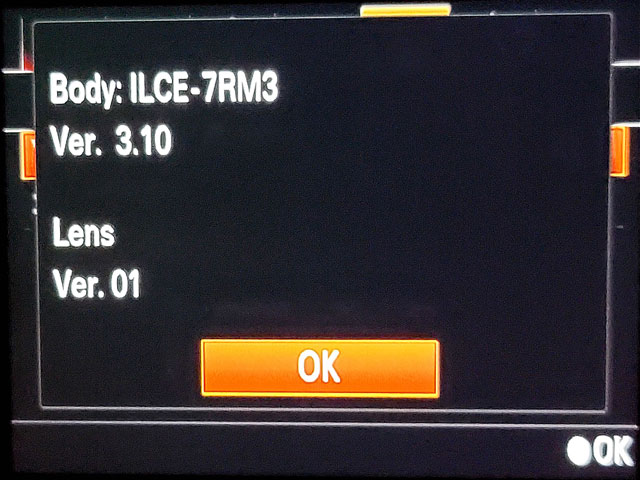
Fig. 1
Fig. 2
- Turn OFF the camera.
- If the lens version is Ver.01 or Ver.02, an update is required.
- To update, check AGREE box for the Program License Agreement and download the firmware of the corresponding lens to your desktop or any folder on your computer.
- Refer to the "Guide for firmware update" below to update the lens with the downloaded file.
Firmware specifications
| Name | Tokina atx-m 23mm F1.4 E Firmware Ver.03 |
|---|---|
| Target model | Tokina atx-m 23mm F1.4 E |
| Version | Firmware Ver.03 |
| Registered name | atx23f14E03.DAT |
| Supported OS |
For Windows: For Mac OS: |
| File type | ZIP file |
| Reproduction | Not allowed |
Guide for firmware update
Items to be prepared:
 |
 |
 |
|
Update requiring lens unit |
USB cable (Type-A to micro-USB) |
Update file (.DAT) |
Procedure:
STEP 1: Connect the micro-USB plug of the USB cable to the micro-USB port of the lens unit.
STEP 2: Connect the other end of the USB cable to the USB port of your computer.
STEPS 3-8 for Windows
STEP 3: The folder will open automatically when the connection between the lens and the computer is completed.
![]()
STEP 4: Unzip the downloaded file new firmware update file (.DAT) with the ZIP file software.
STEP 5: Copy (drag and drop) the downloaded new firmware update file (.DAT) to the opened USB folder of the lens and the firmware update starts to execute automatically.
STEP 6: Once the writing is completed, the USB folder closes, and after a while it opens automatically. With this the firmware update procedure is complete.
STEP 7: Close the folder and safely remove the hardware, then disconnect the USB cable.
STEP 8: After removing the lens, attach it to the camera body and check that the lens version has changed. You can check it by selecting [Setup] → [Version Display] from the [MENU] of the camera.
STEPS 3-9 for Mac OS
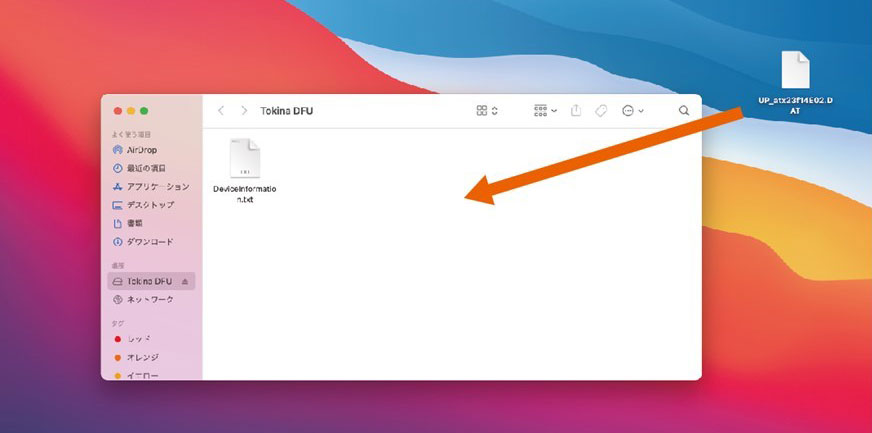
STEP 3: When the connection between the camera lens and the computer is completed, the Tokina DFU folder will be displayed on the desktop.
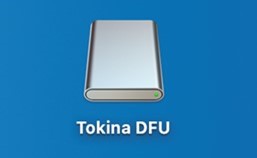
STEP 4: Open the Tokina DFU folder.
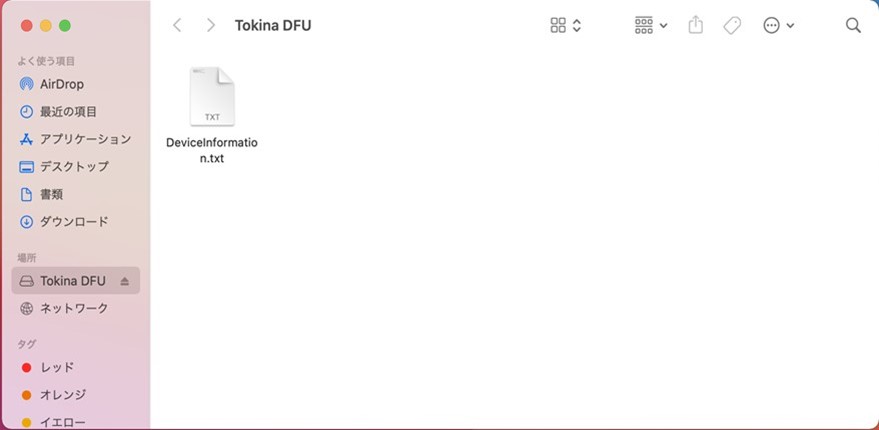
STEP 5: Unzip the downloaded file new firmware update file (.DAT) with the ZIP file software.
STEP 6: Copy (drag and drop) the update file (.DAT) to the opened USB folder of the lens and the update starts to execute automatically.
STEP 7: Once the writing is completed, the USB folder closes, and after a while it opens automatically. With this the firmware update procedure is complete.
STEP 8: "Eject", then disconnect the USB cable.
* After ejecting, the USB folder will be displayed with some delay, but there is no problem with disconnecting the USB cable. A warning window pop-up may also appear after that, but the hardware has been safely removed.
STEP 9: After removing the lens, attach it to the camera body and check that the lens version has changed. You can check it by selecting [Setup] → [Version Display] from the [MENU] of the camera.
This software update is only necessary for Sony E-mount lenses (no update is needed for lenses other than for Sony E-mount).
This software is a program for the Tokina brand products owned by the customer (hereinafter referred to as "target products").
This software will be provided upon customer's acceptance of the following agreement.
Upon checking "I Agree" and selecting "Download", you agree to comply to this agreement.
Please read the contents of this agreement carefully before starting the download of this software.
- This service provides software for updating the firmware of Tokina atx-m 33mm F1.4 E to Ver.03. If you already have the latest version, you do not need to update.
- Please check the following before updating the firmware.
The purpose of new firmware updating
We have found that this lens may be subject to possible compatibility difficulties with upcoming camera firmware updates, or certain camera models to be released in the future.
How to check firmware version
Check with your camera whether the update is required.
Items to prepare:
- Lens to be updated
- Camera body
Instructions:
- Remove the rear cap on the lens unit and match the mount index on the lens unit with the mount index on the camera body in order to attach the lens.
- Turn ON the camera, and check the version from [MENU] →[Setup] (Fig. 1) [Version display] (Fig. 2).
Fig. 1
Fig. 2
- Turn OFF the camera.
- If the lens version is Ver.01 or Ver.02, an update is required.
- To update, check AGREE box for the Program License Agreement and download the firmware of the corresponding lens to your desktop or any folder on your computer.
- Refer to the "Guide for firmware update" below to update the lens with the downloaded file.
Firmware specifications
| Name | Tokina atx-m 33mm F1.4 E Firmware Ver.03 |
|---|---|
| Target model | Tokina atx-m 33mm F1.4 E |
| Version | Firmware Ver.03 |
| Registered name | atx33f14E03.DAT |
| Supported OS |
For Windows: For Mac OS: |
| File type | ZIP file |
| Reproduction | Not allowed |
Guide for firmware update
Items to be prepared:
|
|
|
|
Update requiring lens unit |
USB cable (Type-A to micro-USB) |
Update file (.DAT) |
Procedure:
STEP 1: Connect the micro-USB plug of the USB cable to the micro-USB port of the lens unit.
STEP 2: Connect the other end of the USB cable to the USB port of your computer.
STEPS 3-8 for Windows
STEP 3: The folder will open automatically when the connection between the lens and the computer is completed.
![]()
STEP 4: Unzip the downloaded file new firmware update file (.DAT) with the ZIP file software.
STEP 5: Copy (drag and drop) the downloaded new firmware update file (.DAT) to the opened USB folder of the lens and the firmware update starts to execute automatically.
STEP 6: Once the writing is completed, the USB folder closes, and after a while it opens automatically. With this the firmware update procedure is complete.
STEP 7: Close the folder and safely remove the hardware, then disconnect the USB cable.
STEP 8: After removing the lens, attach it to the camera body and check that the lens version has changed. You can check it by selecting [Setup] → [Version Display] from the [MENU] of the camera.
STEPS 3-9 for Mac OS
STEP 3: When the connection between the camera lens and the computer is completed, the Tokina DFU folder will be displayed on the desktop.
STEP 4: Open the Tokina DFU folder.
STEP 5: Unzip the downloaded file new firmware update file (.DAT) with the ZIP file software.
STEP 6: Copy (drag and drop) the update file (.DAT) to the opened USB folder of the lens and the update starts to execute automatically.
STEP 7: Once the writing is completed, the USB folder closes, and after a while it opens automatically. With this the firmware update procedure is complete.
STEP 8: "Eject", then disconnect the USB cable.
* After ejecting, the USB folder will be displayed with some delay, but there is no problem with disconnecting the USB cable. A warning window pop-up may also appear after that, but the hardware has been safely removed.
STEP 9: After removing the lens, attach it to the camera body and check that the lens version has changed. You can check it by selecting [Setup] → [Version Display] from the [MENU] of the camera.
This software update is only necessary for Sony E-mount lenses (no update is needed for lenses other than for Sony E-mount).
This software is a program for the Tokina brand products owned by the customer (hereinafter referred to as "target products").
This software will be provided upon customer's acceptance of the following agreement.
Upon checking "I Agree" and selecting "Download", you agree to comply to this agreement.
Please read the contents of this agreement carefully before starting the download of this software.
- This service provides software for updating the firmware of Tokina atx-m 56mm F1.4 E to Ver.03. If you already have the latest version, you do not need to update.
- Please check the following before updating the firmware.
The purpose of new firmware updating
We have found that this lens may be subject to possible compatibility difficulties with upcoming camera firmware updates, or certain camera models to be released in the future.
How to check firmware version
Check with your camera whether the update is required.
Items to prepare:
- Lens to be updated
- Camera body
Instructions:
- Remove the rear cap on the lens unit and match the mount index on the lens unit with the mount index on the camera body in order to attach the lens.
- Turn ON the camera, and check the version from [MENU] →[Setup] (Fig. 1) [Version display] (Fig. 2).
Fig. 1
Fig. 2
- Turn OFF the camera.
- If the lens version is Ver.01 or Ver.02, an update is required.
- To update, check AGREE box for the Program License Agreement and download the firmware of the corresponding lens to your desktop or any folder on your computer.
- Refer to the "Guide for firmware update" below to update the lens with the downloaded file.
Firmware specifications
| Name | Tokina atx-m 56mm F1.4 E Firmware Ver.03 |
|---|---|
| Target model | Tokina atx-m 56mm F1.4 E |
| Version | Firmware Ver.03 |
| Registered name | atx56f14E03.DAT |
| Supported OS |
For Windows: For Mac OS: |
| File type | ZIP file |
| Reproduction | Not allowed |
Guide for firmware update
Items to be prepared:
|
|
|
|
Update requiring lens unit |
USB cable (Type-A to micro-USB) |
Update file (.DAT) |
Procedure:
STEP 1: Connect the micro-USB plug of the USB cable to the micro-USB port of the lens unit.
STEP 2: Connect the other end of the USB cable to the USB port of your computer.
STEPS 3-8 for Windows
STEP 3: The folder will open automatically when the connection between the lens and the computer is completed.
![]()
STEP 4: Unzip the downloaded file new firmware update file (.DAT) with the ZIP file software.
STEP 5: Copy (drag and drop) the downloaded new firmware update file (.DAT) to the opened USB folder of the lens and the firmware update starts to execute automatically.
STEP 6: Once the writing is completed, the USB folder closes, and after a while it opens automatically. With this the firmware update procedure is complete.
STEP 7: Close the folder and safely remove the hardware, then disconnect the USB cable.
STEP 8: After removing the lens, attach it to the camera body and check that the lens version has changed. You can check it by selecting [Setup] → [Version Display] from the [MENU] of the camera.
STEPS 3-9 for Mac OS
STEP 3: When the connection between the camera lens and the computer is completed, the Tokina DFU folder will be displayed on the desktop.
STEP 4: Open the Tokina DFU folder.
STEP 5: Unzip the downloaded file new firmware update file (.DAT) with the ZIP file software.
STEP 6: Copy (drag and drop) the update file (.DAT) to the opened USB folder of the lens and the update starts to execute automatically.
STEP 7: Once the writing is completed, the USB folder closes, and after a while it opens automatically. With this the firmware update procedure is complete.
STEP 8: "Eject", then disconnect the USB cable.
* After ejecting, the USB folder will be displayed with some delay, but there is no problem with disconnecting the USB cable. A warning window pop-up may also appear after that, but the hardware has been safely removed.
STEP 9: After removing the lens, attach it to the camera body and check that the lens version has changed. You can check it by selecting [Setup] → [Version Display] from the [MENU] of the camera.